
Wall hanging heart shape yarn +++ My DIY Valentine's project 2019 +++
This was one of my decor obsession of 2018, and apparently it is continuing on 2019! I have to accept that when I love something too much I became a little repetitive! ;-)
I was looking for a quick and boho touch for the master bedroom, but it had to be a DIY and a cheap one! I found some ideas in @pinterest but I wanted to try something new, I love hearts and the master bedroom has some pink accents, and Valentine's around the corner, all of this ended up convincing me about this idea, this Wall Hanging yarn heart shape!
If you are reading me and you like it, let's work! This is a very easy project for beginners like me!
Depending on how big or small you want to create your project, the needed quantity of yarn will vary , I used 3 colors, but in total a half of yarn, as one yarn shown in the picture below.
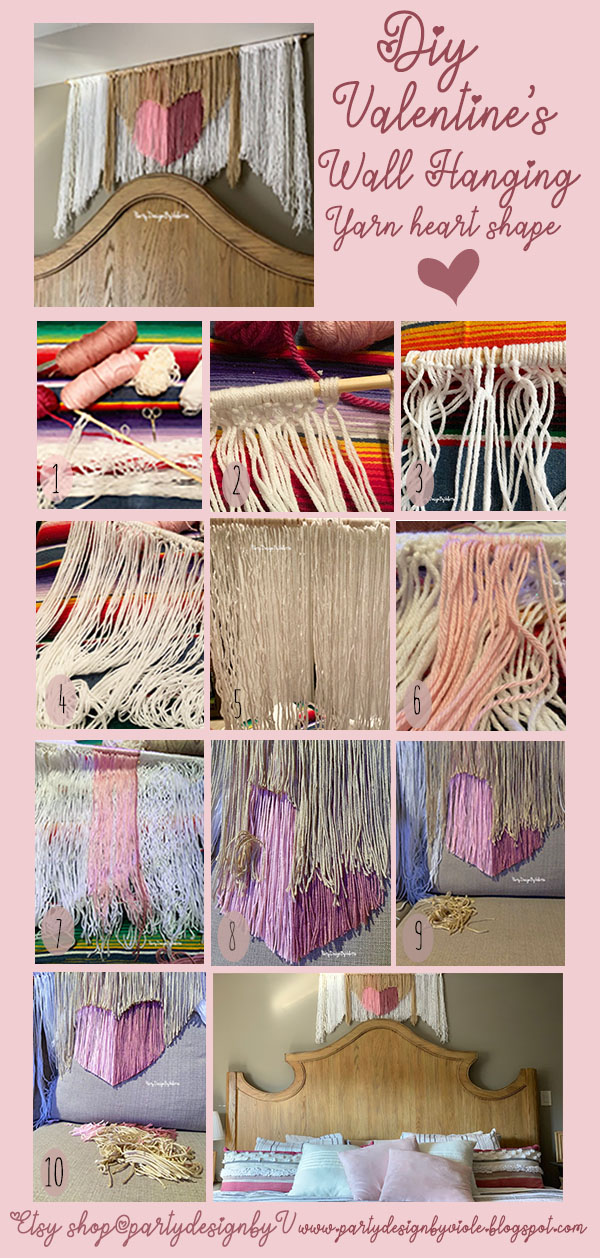
Material for this project, we just need scissors, this small one, it's perfect for craft, 2 or 3 round shape small wooden dowel and yarn in your favorite color. I just used 2 wooden dowel, the first larger that the second, almost half of it.
I did a first white layer yarn for the largest wooden dowel, and a shorter pink layer yarn, overlapped with the white one, as shown below. I placed them in the same piece of wood, and for the 3rd color/layer, I attached the second wooden dowel making knots to both sticks, see below my photos with step by steps instructions, it's pretty easy, no issues here to attached both.


I did double knots in the first layer, layer white, because I planned to overlap then the pink layer, but actually I thinks it's not really necessary to do double knots, with regular ones would work the same way. The layer one is the longest one. Once you finished with layer one, mesure the half and start with the pink layer, or the color of your choice, this would be the heart shape layer. I decided to just do this layer in the middle of the wooden dowel, and I liked how it turned into, how the heart was positioned in the middle, but once again, you can try endless ideas, colors, long, shapes, textures, etc.
For the layer number 3, beige color layer, I used a half of wooden dowel and while I was knotting I was attaching at the same time the piece of wood to the first one, pretty easy, not complications there. This last layer, beige color layer, is the shortest one, we need to cut the top of the heart in there. In the pink layers, the second one, we just cut the bottom of the heart shape, in a kind of round side triangle. Layer number one, the white one it's just the background.


The better thing to do when we are cutting layers, is just hanging it, because the cut is very important, if not we can't get the perfect heart shape. When I cut the heart shape and adjust the others layers, I did some geometric shapes with the first white layer and also added some more beige yarn on the heart sides, longer. You can see that below, two pictures showing the difference. I also added longer white yarn at each side, and voila... you need to be creative and not really need to follow all my steps, once you get it, just do it!
It's all about letting your imagination go far away here! And enjoy the process!
You can add wool braids, beads, texture yarn, tassel or pompom, and of course you can do a small, tiny version for little gift for Valentine's ! Ideas and more ideas to keep creating amazing projects!
Please share your project with me or tag me if your tried it!!!! #partydesignbyviolettadiy


Comments
Post a Comment